watari開発 – Advent201909 –

stage9: テキストを保存する
さて、早速取り掛かろう。しかし、3年ほど前に触った時よりも様変わりしているものである。昔はstoryboardだったが、今はSwiftUIか。噂には聞いていたが。あとはObjective-Cもまぁまぁ書いていたけど、純Swiftで構築できるようになっているのかな。
何はともあれ…
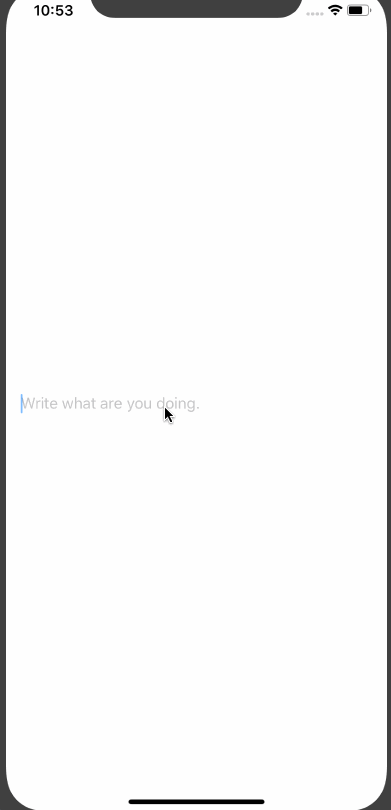
テキストを入力できるようにする
まずは、input fieldを用意しよう。
//
//  ContentView.swift
//  watari
//
//  Created by Yasuyuki Toriumi on 2019/12/05.
//  Copyright © 2019 wataridori inc. All rights reserved.
//

import SwiftUI

struct ContentView: View {
    @State var inputText = ""

    var body: some View {
        TextField("Write what are you doing.", text: self.$inputText )
            .padding(.all)
    }
}

struct ContentView_Previews: PreviewProvider {
    static var previews: some View {
        ContentView()
    }
}
これでひとまず入力はできるようになった。
入力したデータをローカルに保存する
ぱっと調べてみたところ、UserDefaultsというやつとCoreDataがローカルデータの永続化には使えそうだな。さらにもうちょい調べると、UserDefaultsは提供されている型の簡単な保存に向いているらしくユーザーに紐づいた簡易な情報をいれておくのには向いていそうだけど、今回のようにコンテンツが増加していったり型がそもそもオリジナルになったりしそうなモノにはCoreDataが良さそうかな。
ということで作ろうCore Data。
定義ファイルの作成
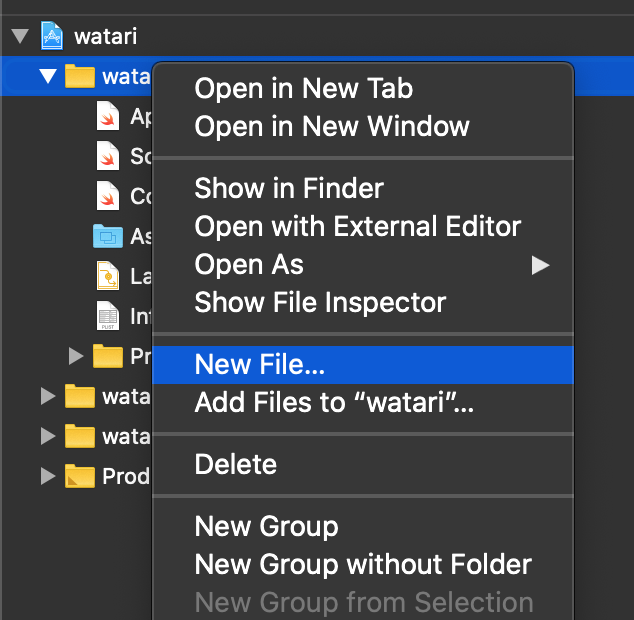
New Fileで新しいファルを追加する。
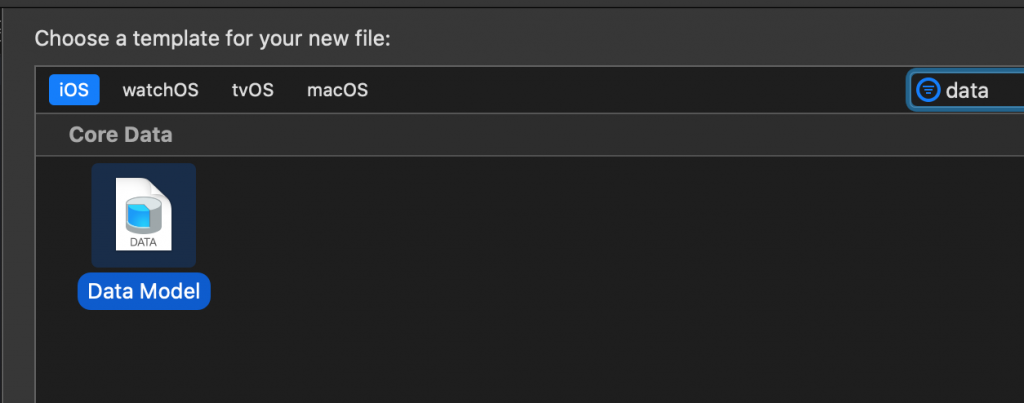
Data Modelを選択して追加する。
名前は watari という名前にした。
watari.xcdatamodeld というファイルが生成される
使えるようにするために既存コードの改修
https://programmingwithswift.com/add-core-data-to-existing-ios-project/
にあるように persistentContainer を初期化するコードとsaveするコードを埋め込む。
//
//  AppDelegate.swift
//  watari
//
//  Created by Yasuyuki Toriumi on 2019/12/05.
//  Copyright © 2019 wataridori inc. All rights reserved.
//

...
import CoreData

...
lazy var persistentContainer: NSPersistentContainer = {
        /*
         The persistent container for the application. This implementation
         creates and returns a container, having loaded the store for the
         application to it. This property is optional since there are legitimate
         error conditions that could cause the creation of the store to fail.
         */
        let container = NSPersistentContainer(name: "watari")
        container.loadPersistentStores(completionHandler: { (storeDescription, error) in
            if let error = error as NSError? {
                // Replace this implementation with code to handle the error appropriately.
                // fatalError() causes the application to generate a crash log and terminate. You should not use this function in a shipping application, although it may be useful during development.

                /*
                 Typical reasons for an error here include:
                 * The parent directory does not exist, cannot be created, or disallows writing.
                 * The persistent store is not accessible, due to permissions or data protection when the device is locked.
                 * The device is out of space.
                 * The store could not be migrated to the current model version.
                 Check the error message to determine what the actual problem was.
                 */
                fatalError("Unresolved error \(error), \(error.userInfo)")
            }
        })
        return container
    }()

    // MARK: - Core Data Saving support

    func saveContext () {
        let context = persistentContainer.viewContext
        if context.hasChanges {
            do {
                try context.save()
            } catch {
                // Replace this implementation with code to handle the error appropriately.
                // fatalError() causes the application to generate a crash log and terminate. You should not use this function in a shipping application, although it may be useful during development.
                let nserror = error as NSError
                fatalError("Unresolved error \(nserror), \(nserror.userInfo)")
            }
        }
    }
...
データ構造の追加
作成した watari.xcdatamodeld をクリックすると編集画面が出てくるので以下のようにEntityを追加。

シンプルに
EntryText
   - body (string)
   - createdAt (Date)
という構造をしているだけである。
read, write & delete
https://developer.apple.com/documentation/coredata/modeling_data/generating_code
これによれば、クラス定義とかpropertyとかに変更を加えないのであれば自動生成される。というcodegenのoptionがあるのでそちらを設定しておく(default)
これでEntryTextクラスは利用可能になったはずだ。
ということで必要になりそうな
- 追加ボタン
- 追加したentityを表示するリスト
- 削除機能
を追加していく。
まずは SceneDelegate.swiftに変更を加えて、上で追加した persistentContainerから managedObjectContext をviewで使えるようにする。これがないとデータの永続化ができない。webの知識でいうところのdb connectionみたいなものだろうか。
+        let managedObjectContext = (UIApplication.shared.delegate as! AppDelegate).persistentContainer.viewContext
         // Create the SwiftUI view that provides the window contents.
-        let contentView = ContentView()
+        let contentView = ContentView().environment(\.managedObjectContext, managedObjectContext)
次に、ContentViewを修正する。一気に書いているのでごちゃごちゃしているが、気が向いたらリファクタとか責務分けとか細かいことをしよう。とりあえず動くの大事。
managedObjectContextを参照(Environment経由)- 保存したデータをfetchするために@FetchRequestを定義
- View内で取得データを使ってList表示
- データの追加、削除を可能にする
+import CoreData

 struct ContentView: View {
-    @State var inputText = ""
+    @Environment(\.managedObjectContext) var managedObjectContext
+    @FetchRequest(fetchRequest: getEntryTexts()) var entryTexts: FetchedResults<EntryText>
+
+    @State var newEntryText = ""

     var body: some View {
-        TextField("Write what are you doing.", text: self.$inputText )
-            .padding(.all)
+        VStack{
+            List{
+                ForEach(self.entryTexts, id: \.self) {entryText in
+                    VStack {
+                        Text(entryText.body!)
+                        Text("\(entryText.createdAt!)")
+                    }
+                }.onDelete(perform: {indexSet in
+                    let deleteEntry = self.entryTexts[indexSet.first!]
+                    self.managedObjectContext.delete(deleteEntry)
+
+                    do {
+                        try self.managedObjectContext.save()
+                    }catch{
+                        print(error)
+                    }
+                })
+            }
+            TextField("Write what are you doing.", text: self.$newEntryText )
+                .padding(.all)
+            Button("add", action: {
+                let entryText = EntryText(context: self.managedObjectContext)
+                entryText.body = self.newEntryText
+                entryText.createdAt = Date()
+
+                do {
+                    try self.managedObjectContext.save()
+                }catch {
+                    print(error)
+                }
+                self.newEntryText = ""
+            })
+        }
     }
 }

+func getEntryTexts() -> NSFetchRequest<EntryText> {
+    let request: NSFetchRequest<EntryText> = EntryText.fetchRequest()
+    let sortDescriptor = NSSortDescriptor(key: "createdAt", ascending: true)
+    request.sortDescriptors = [sortDescriptor]
+    return request
+}
といった修正をすると
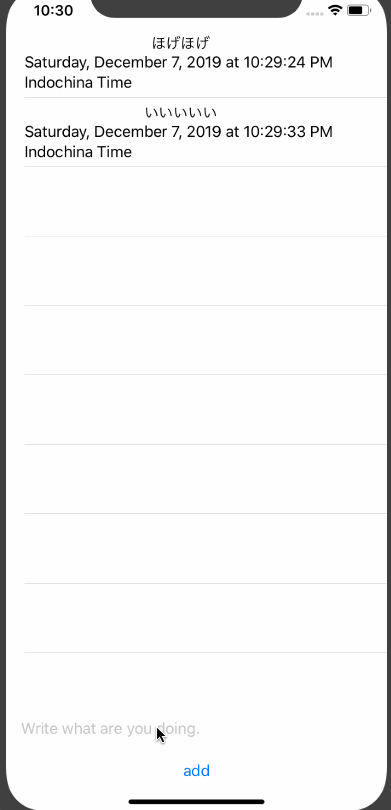
こんな感じになる。
次回は
テキストの投稿ができるようになった。しかし、まだこれだとローカルで日記つけている以下のなにものでもない。
可能なのかしらないけどtwitter連携でも模索してみよう。
- 前の記事

watari開発 – Advent201908 – 2019.12.08
- 次の記事
watari開発 – Advent201910 – 2019.12.10